This website uses cookies, which are necessary for the technical operation of the website and are always set. Other cookies, which increase the comfort when using this website, are used for direct advertising or to facilitate interaction with other websites and social networks, are only set with your consent.
Configuration
Technically required
These cookies are necessary for the basic functions of the shop.
"Allow all cookies" cookie
"Decline all cookies" cookie
CSRF token
Cookie preferences
Currency change
Customer-specific caching
Individual prices
PayPal payments
Selected shop
Session
Comfort functions
These cookies are used to make the shopping experience even more appealing, for example for the recognition of the visitor.
Note
Statistics & Tracking
Affiliate program
Track device being used
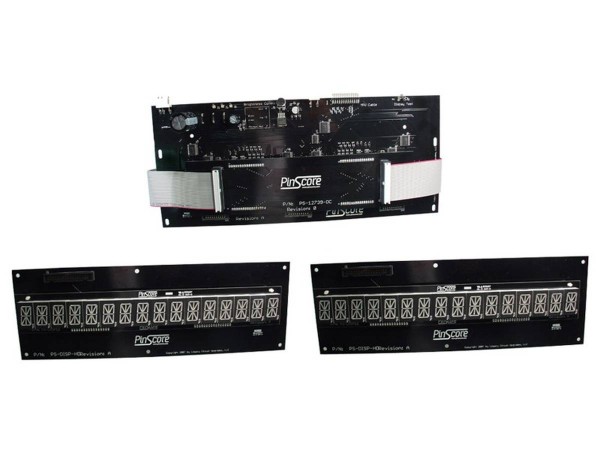
PinScore Pinball LED Display for Bally Harley Davidson & Dr. Dude (WPC89)
Click to enlarge (Illustration similar)
This product is currently not available.
Please inform me as soon as the product is available again.
This PinScore LED display system is a complete, drop-in replacement display system. The low-voltage, high-efficiency displays use only your game's 5-volt supply and will work on pinball machines with failed high voltage power supplies. With custom-engineered color-matched LED (light emitting diode) blocks, the displays retain the game’s factory look while adding features like adjustable brightness and self-test.
Features:
- Plug & Play installation - Adjustable brightness - Low power consumption uses only 5 volt power and no high voltage - Beautiful black matte finish - Foam light shields prevent general illumination leakage glare - Crisp alpha and numeric digits illuminate in original font and color - 5 year warranty - Assembled in USA - RoHS compliant
Compatible Games:
- Dr. Dude - Harley Davidson
Installation Instructions:
Remove Old Displays. Unplug the AC power from your pinball machine. Remove game backglass and open the backbox insert door. Remove the speaker/display panel and unplug all display boards. Remove the original display and driver boards.
Mount the new boards. Hand-tighten the screws so you may align the displays with the backglass windows before permanently securing the boards. If further alignment is necessary, you may adjust the insert panel door hinges and latch in the backbox.
Connect the cables. The ribbon cable goes to the connetor labeled MPU Cable. The power connectors, J100 and J101, are keyed to prevent incorrect alignment. Ribbon cables are not keyed and it is possible to mis-align the connectors. Observe correct polarity on all ribbon cables - the RED striped wires on all ribbon cables go to PIN #1 (also labeled as Red) on the board.
Double-check all connections, plug in the machine, and turn the game on. There are three indicator LEDs to the left of the Brightness Control labeled D1, D2, D3. D1 will flash momentarily upon power-up and D2 and D3 will stay lit indicating that the power supply is working correctly. The PS-DISP16 alphanumeric LED’s will light up.
Pressing the diagnostic pushbutton labeled SW1/Display Test on the PS-12739 board will illuminate all segments of all displays. This indicates that all components of the PinScore System are operating correctly. Use the thumbwheel labeled Brightness Control to set your preferred illumination level.
Related links to "PinScore Pinball LED Display for Bally Harley Davidson & Dr. Dude (WPC89)"
This website uses cookies, which are necessary for the technical operation of the website and are always set. Other cookies, which increase the usability of this website, serve for direct advertising or simplify interaction with other websites and social networks, will only be used with your consent. More information
")

")

")
 - Security Bit")
")


